The Art of Dental Simulation Treatment Using the Artificial Intelligence
2 Oral and Maxillofacial Prosthodintics Department, King Abdul-Aziz University, Jeddah, Saudi Arabia, Email: omarali4@hotmail.com
3 Dentist at Ministry of Health, Certified Trainer of Exocad Program, Assiut, Egypt
4 Implantology and Cosmetic Dentistry Department, Assiut University, Assiut, Egypt
Received: 04-Feb-2022, Manuscript No. AMHSR-22- 51715; Editor assigned: 07-Feb-2022, Pre QC No. AMHSR-22- 51715(PQ); Accepted Date: Feb 27, 2022 ; Reviewed: 14-Feb-2022 QC No. AMHSR-22- 51715; Revised: 21-Feb-2022, Manuscript No. AMHSR-22- 51715(R); Published: 27-Feb-2022, DOI: 10.54608.annalsmedical.2022.31
Citation: Abuzinadah SH, et al. The Art of Dental Simulation Treatment Using the Artificial Intelligence. Ann Med Health Sci Res. 2022;12:63-71.
This open-access article is distributed under the terms of the Creative Commons Attribution Non-Commercial License (CC BY-NC) (http://creativecommons.org/licenses/by-nc/4.0/), which permits reuse, distribution and reproduction of the article, provided that the original work is properly cited and the reuse is restricted to noncommercial purposes. For commercial reuse, contact reprints@pulsus.com
Abstract
Background: In daily practice, patients often inquire about how cosmetic procedures in the anterior teeth can affect the appearance of their smile. When attempting to have reasonable and clear responses, the dentist will use image and picture-processing tools on a picture of the smile to replicate the treatment expected alterations. The DTS PRO is a simple-to-use tool in the same software category that provides a variety of tools that the clinician able to use to display the potential restorations on a smile image digitally. Methods: This paper aimed to explain the procedures and possessions of digital simulation of cosmetic restorations indicated for sixty participants 20 patients, 20 dentists and 20 technicians for esthetic treatments of anterior teeth using DTS PRO version 15.9. The intended restorations included laminates, tooth whitening, digital smile designs, orthodontic tooth movement, bonding, gingivectomy and CLP, replacement of missing tooth/teeth, and extraoral changes after orthodontics/ orthognathic surgeries. Results: The simulation technique for restoration work designed for anterior teeth tends to be a valuable way of enhancing contact between the dentist, the patient and the laboratory. Various methods used to execute such a method, depending on the program chosen. Understanding of dental photography and simple handling of the image, processing software is an essential requirment for effective simulation. Conclusion: The used software powered by AI assists clinicians at various digital workflow stages and offers guidance on digital technology improvements and advancement before the patient’s acceptance of the treatment scheme. Clinical Significance: Clinicians, patients and technicians may use three-dimensional interdisciplinary models to see how each dental procedure affects subsequent treatments. Expectedness of various processes in esthetic dentistry, ortho, implant, periodontics and oral maxillofacial surgery is increased with this treatment planning strategy, as is patient awareness and satisfaction.
Keywords
Esthetics dentistry; Processing dental image; Computer simulation; Software
Introduction
The Digital Smile Template is a multi-purpose tool that can help the restoration team, show that the dental team is aware of aesthetic concerns, and improve patient acceptance. The use of reference lines and other shapes over extra- and intraoral digital photographs expands the the m. It aids in determining the case's limitations, risk factors, and aesthetic principles. These crucial data will lead to improved outcomes throughout the treatment process. [1,2]
We must train ourselves to see the design differently while digitally operating to open up digital dentistry's real power. Thanks to the 'copy-paste' solutions and the power of digital dentistry, beauty is now able to be captured and stored and multi-purpose in an infinite range of designs and materials, including morphologies and forms that never refresh themselves, and to restore what is close to what was intended digitally. [3,4]
DSD technology is carried out using digital devices, such as a device fitted with a DSD app, a digital camera, or a smartphone, which is already in use in current dental practice. Additional tools for full 3D workflows include a digital intraoral digital scanner 5, a 3D printer, and CAD/CAM. Precise photographic documentation is vital since full facial and dental analysis relies on preliminary photographs that formulate adjustments and design for dynamic analyzes in the smile, laugh, and talk of teeth, gingiva, and lips, to incorporate facial-driven concepts in the smile design. [5]
Several studies demonstrate the effectiveness of computer visualization for clarifying patient likings and for accomplishing an expectable and acceptable prosthetic treatment result. [6,7] Excellent quality dental software is available on the market. A common feature of all smile design software systems is assessing the smile in the overall facial context. Therefore, all smile design concepts and systems need a facial picture of a natural smiling. [8]
This study aimed to investigate the quality of reality of DTS PRO as a new software powered by artificial intelligence and quickly identify a person's smile configuration. Such an analysis then enables creating a digital design for the prosthetic restoration of the anterior teeth.
The mock-up
The visualization of the end result have a huge effect on the patient's perception. It is more effective than just describing the result orally. Before starting any treatment, it is compulsory to visualize the anticipated outcome. It would then be conceivable to proceed the necessary phases to obtain the desirable outcome [Table 1].
| Sl.no | Tool/function | Ideal features | DTS Pro.score |
|---|---|---|---|
| 1 | Orofacial analysis | Frontal and lateral analysis with tools as cephalometric, denture parameters, and esthetic guidelines. | Frontal only |
| 2 | Digital smile design | Facially driven 3D digital smile design | ✓ |
| 3 | Link 2D-3D | 2D-3D link to bring facial reference lines from 2D to 3D | |
| 4 | Functional wax-up | 3D virtual upper and lower wax-up with natural teeth libraries | |
| 5 | Occlusal analysis | Tools for digital occlusal analysis | |
| 6 | Virtual articulator | Virtual articulator and vertical dimension modifications integrated with jaw movements | |
| 7 | Calibration | Computerized synchronization of 2-dimensional intra - oral and facial scanning and 3d face scans. | ✓ |
| 8 | Merging | Integrating the optimal configuration of orthodontic simulations, periodontium surgery planning, digital articulator, and implant planning | |
| 9 | Interdisciplinary 3D simulation | A method for performing collaborative interdisciplinary simulations to determine the effect of one on the other. | ✓ |
| 10 | Orthodontic simulation | Tooth movement simulation | ✓ |
| 11 | Orthognathic simulation | Extra oral soft tissue simulation and maxillary and mandibular corrections simulation | ✓ |
| 12 | Perio simulation | Virtual gingivectomy on a digital model, hard and soft tissue grafting style, and 3D assessment of graft volume | |
| 13 | Implant simulation | Implant location and superimposition of ideal template with CBCT file | ✓ |
| 14 | Measurements | Tool for measurements | ✓ |
| 15 | Translucency | To imagine ideal concept and treatment simulations, use partial transparency. | ✓ |
| 16 | Smart feature using | Powered by Artificial Intelligence (A.I.) or ML ("Meta | ✓ |
| AI/ML | Language") is a general-purpose functional programming language | ||
| 17 | Ease of use and case scenario | Easy application and show Single tooth to Full mouth planning, jaw, and lip changes | ✓ |
| 18 | Cost | Free or low cost |
Table 1: The ideal features of dental treatment simulation software.
Mock-up smooth the communication with the patient by viewing them the expectable final result of the treatment and to compare pre and after treatment. In addition, allow the clinician to check the functional aspects, such as cases that need changing the vertical dimension. Mock-up either fabricated intra orally or extra orally through wax up or digital simulation. [3,9,10]
Customized smile design
Restructuring of the teeth tends to be a valuable means for enhancing the communication between the dentist, patient and laboratory. Different methods may be used to carry out such a procedure depending on the chosen software. Both dental photography expertise and a simple image editing program's manipulation are regarded as essential for effective simulation. [11]
The optimal dental platform should also convert speech representation of the care strategy into photos and animations, improving patient knowledge and inspiration. The best digital technology is that technology manages both patient information and network data to support diagnosis driven by Artificial Intelligence (AI). AI will promote interactive access and encourage interdisciplinary collaboration by allowing experts to communicate their ideas through 3D modeling that enhances decision and risk management over mutual aptitude.
AI solutions are currently in progress, (i) Smile Design: Solutions “DSD App” use AI suggest the preliminary design of the smile but still needs a human assist to make it perfect. (ii) Ortho treatment plan solutions such as invis align that offer an advance prediction of tooth movement and biomechanics. (iii) Radiographic interpretation and tracing solutions, allowing the physicians to understand the radiographic in 3D image, allocate an accurate information to facilities the physician work, and place the proper treatment plan based in accurate data. The optimal dental interface should also convert speech presentation of the care strategy into images and animations that improving patient knowledge and inspiration. Finally, streamlined proposals will be enforced by pre-case approval software and post software to direct clinical practices and digital quality management. [12]
Beyond what dental science predicts, it is essential to be taken seriously, especially on aesthetics and the patient's subjective view. At the communication level dentist and patient, Papasotiriou et al. report that the simulation of restorations on PC was more effective in achieving the treatment plan by the patient from other conventional methods, including presentation of photos before and after treatment other patients, the manufacture of diagnostic wax-and temporary restorations of composite resin-directly on the teeth. [13] In another corresponding study concerning corrective interventions in the broader area of the face, 92% of patients agreed that the computer display should be part of the standard preoperative evaluation accounting. [14] is the fact that digital simulation is a reasonably personalized and accurate procedure framework that helps patients perceive medical concepts that would be difficult to understand alone with oral descriptions.
Features of DTS PRO simulation software
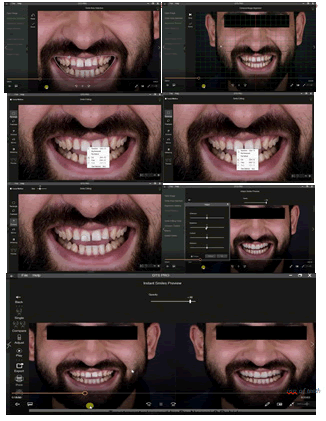
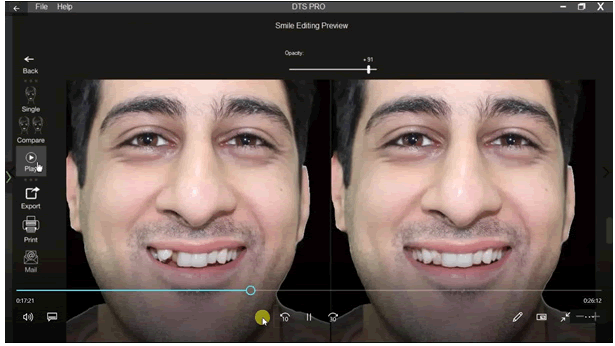
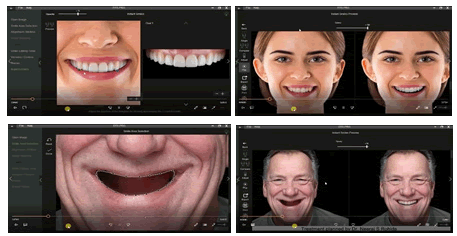
Although the perfect program with all the requisite resources and features is not yet affordable, the DTS PRO comes near. DTS PRO is a simulated world that brings clinicians to the planning center via chair-side applications, allowing the organization of full patient details, encouraging team coordination, conducting facial analysis, designing an optimal initial smile template, and enabling care simulations. The DTS PRO app has two aspects: Facial analysis including smile design and three-dimensional interdisciplinary simulation [Figures 1-3].
Facial recognition and smile modeling may be done using different, specialized tools. Like "digital wax-up" applications, an optimal 3D modeling file can be exported to the planning software to execute all multiple disciplines simulations [Figure 3]. This would become common as its handy to use. AI assisted program was only used for smile modeling with no using the treatment imitations. Another benefit of the program is "digital wax up" applications which is user-friendly, supplying rehabilitative by an easy collaboration mechanism with their dental labs that designs the restorations. In the "wax up" software, the dentist will open the project to study, change and authorize the design of the laboratory in order to resume the work [Table 2].
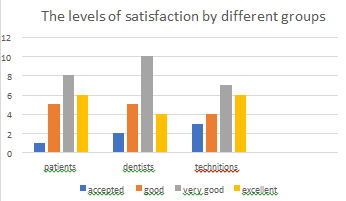
| Accepted | Good | Very good | Excellent | |
|---|---|---|---|---|
| Patients | 1 | 5 | 8 | 6 |
| Dentist | 2 | 5 | 10 | 4 |
| Technician | 3 | 4 | 7 | 6 |
Table 2: Expectation of final restoration.
Multidisciplinary 3D models enable doctors with the ability to imagine each clinical operation and its effect on further care. Such as, visualized the orthodontics cases before starting the treatment that allow minimize the treatment to the steps just need it. [13-15] Similarly, the lengthening of the crown on the adjacent teeth can enhance the esthetic outcome of the dental implant in the anterior region. [16] As a result, the predictability of various treatments in restorative dentistry, orthodontics, implant dentistry, periodontics, and oral maxillofacial surgery is improved by using this patient preparation technique. [17]
DTS PRO is an imitation software that set the treatment plan, and smile design digitally. DTS PRO offer a simulations for multiple care choices using basic images, right in the first appointment or even over interactive consultation platforms. This has a significant impact on patient motivation and decision-making, thereby contributing to a higher level of case acceptance. DTS PRO can be used to build everything from basic single-tooth cases like whitening, and gingival recontouring to more complicated smile patterns, Orthodontics, and full mouth rehabilitations.
Simulations that can be carried out using DTS: Laminates, tooth whitening, digital smile designs, diverse types of braces, orthodontic tooth movement, bonding, gingivectomy and CLP, replacement of missing tooth/teeth, and extraoral changes after orthodontics/orthognathic surgeries. The launch of DTS PRO version 15.9, powered by artificial intelligence, added new tools and features as; Instant smiles background transparency tool, tooth shade adjustment tool, adjustable gum color of smile templates, Updated library of natural smile templates, lip Smoothen tool for natural simulations, and optimized user interface and security features
Advantages of this approach include the following
1.The ability to produce more than one alternative version of the treatment plan.
2.Reducing the likelihood of misinterpretation on the part of the patient.
3.The patient's understanding of what is realistic or not.
4.Reducing doubts and concerns of the patient because the final result is approximated.
5.Creating a guide to building more predictable restorations in the laboratory.
The edited photos presented live the various alternatives that can be printed and given to the patient to assess them alone or with the shutter. The process is an additional positive incentive for the patient to proceed with the treatment. The main disadvantage is that more procedures followed in P.C. to modify an area are different from the real ones digitally. Furthermore, the procedure has the disadvantage that lives the final result only in its two dimensions space
The purpose of this article is to present the application of this procedure to the approximation of the result of some of the most routine dental procedures in the anterior region of the dental arch, such as laminates, tooth whitening, digital smile designs, diverse types of braces, orthodontic tooth movement, bonding, gingivectomy and CLP, replacement of missing tooth/teeth, and extraoral changes after orthodontics/orthognathic surgeries.
Materials
1.Software: DTS PRO software
2.Operating system: Microsoft Windows 10 educational or Professional
3.C.: Intel Core 5 1.66 GHz CPU, 2 GB RAM.
4.Graphics tablet: Bamboo Pen Tablet
5.professional camera or high x mobile camera
6.Cases: Laminates, tooth whitening, digital smile designs, diverse types of braces, orthodontic tooth movement, bonding, gingivectomy and CLP, replacement of missing tooth/teeth, and extraoral changes after orthodontics/orthognathic surgeries
Methods
Due to the multiple possibilities offered by software, there are many methods to achieve the same result. The study carried out on 60 participant; 20 patients, 20 dentist and 20 technician from multiple private dental centers to assess the level of perception and satisfaction of the participants and the role of dental simulation software in final decision for treatment procedure. The assessment scale graduated from accepted, good, very good and excellent levels for all the groups for different esthetics procedures.
How to shoot the images?
DTS pro support PNG, PENG/JPG image formats. Any raw image must be first converted to the formats before it can open on DTS PRO. Shoot the extraoral image in a wide smile position; there is should a full display of teeth and gingiva. Upper and lower teeth slightly apart [Figure 1].
Shoot the intraoral retracted image; it should be the same angulation of the extraoral images; upper and lower should be slightly apart as the extraoral images.
Tip; to maintain the same angulation between the intraoral and extraoral images; let the head of the patient rest against the wall. Image editing: The image can be scrolled by pressing and moving the central wheel of the mouth. The image editing screen allows adjusting the brightness, contrast, rotation, and cropping the uploaded image; after selecting the area to be cropped, press ENTER key or press CROP apply changes; if there are no changes needed in the uploaded image, press DONE.
Smile area selection: Automatically detected, it can be refined by moving the control points or manually detected if the software cannot detect the smile area or automation is disabled by left-clicking and dragging from one corner of the mouth to the other, the selection should follow the inner border of the lips. No part of the teeth should extend outside the selected smile area, the selection can be adjusted by moving the control points, shaped, once the smile area is selected, press DONE to go to the next screen, to delete a selection press RESET.
The image alignment; can be done automatically by the software itself by detecting the interpupillary line and select the facial midline (yellow line). The midline can be moved if required. Also, the alignment can be done manually for the extraoral image; click and drag the black control points to the center of the eye pupils. Adjust the yellow centerline, if required, to fix the facial midline. This step can be skipped for specific simulations such as whitening, gingivectomy, insert different types of braces, etc., where the visualization of the facial midline is not necessary. For the retracted image, click and drag the black control points to follow the occlusal plane; the cusp tip of the canines can be used as reference points.
Image mapping
This step needed to overlap the extraoral and the retracted images by selecting two points on the extraoral image and two corresponding points on the retracted images. generally prominent and easily identifiable points such as tips of papillae or cusp tips can be used; once the points are selected, press CHECK FIT to adjust the image overlap then the image can be adjusted by moving the control points till the best fit is obtained, which can be verified using the opacity slider bar.
Mapping 3D scan and image; to move; left click on the scan and drag to resize; the Ctrl key and left-click and move the mouse up/down.
To rotate X/Y Axis: Left click outside the scan and move up/down or right/left
To rotate Z-Axis: Shift key and left-click outside the scan and move up/down
Smile editing tools
1.The smile editing and selection tools can be made by a rectangular or by the free hand selection tool.
2.The selection can be transformed by resizing/rotation/or moving by right-clicking inside the selection area.
3.Rectangular selection tool by left click and drag.
4.The freehand selection tool by left click.
Tooth movement
Any selected tools can select the tooth or teeth to be moved, then click right to resize/rotate, move or copy/paste the selection; after the desired action is carried out, press ENTER key Whitening teeth; on the smile editing tool screen, press the button "WHITENING" and whiten or brighten the color.
To whiten or brighten a tooth, select it and press the "whitening" button.
Extend tool can be used to extend the gingiva to simulate gingivectomy.
It can also be to extend the tooth to simulate the enameloplasty or composite bonding procedure, and the brush size can be altered as needed. A mirror tool; can be used to mirror one part of the image and paste it over another part.
To select the area to be mirrored, press the "ALT" key and left-click on the area to be selected, then move the circular cursor over the area to be replaced and left click
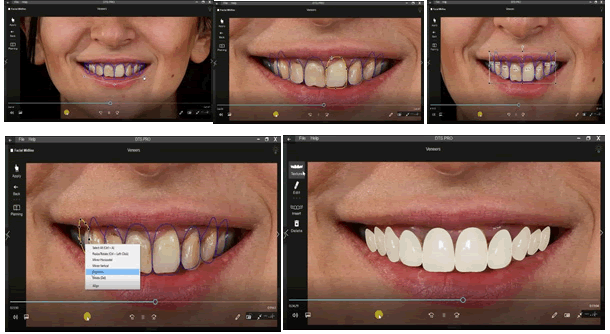
The mirror tool can simulate crowding correction when one side is crowded and the other is normal. It can also be used to simulate the replacement of missing teeth 9. Designing veneers or crowns; select the type of veneer to be inserted from the template library, scroll on the template names such as oval/triangular to select all, or press on the individual templates to select the required number of veneers [Figures 4-6].
Once the templates are selected, the adjustments can be made by resizing/rotating, or aligning functions to get the best fit. Veneers can be adjusted as a group or as individual templates by right-clicking and selecting the desired options.
Facial medlines can be used as a guide to achieving proper positioning; as far as possible, the veneer outline should fully cover the teeth that need to be veneered; in case the underlying teeth to be modified, go to the smile editing screen, select templates, and using the references of the desired templates outlines, modify the underlying tooth by using the extend tool/once the outline is designed, press "APPLY." The veneers get an automatic default texture. To change the texture, go to the texture screen.
Applying texture to veneers; can be inserted by using automatic teeth textures available from the textures library by selecting the desired texture and press "APPLY" or by selecting a texture from the patients own teeth from extraoral or retracted images by click on the veneer to be which texture has to be inserted (the outlines turns green). On the image on the right-left click and drag on the corresponding tooth to cover the maximum tooth surface and press APPLY. Follow the same steps for each veneer or by selecting a texture from any other image [Figures 7-9].
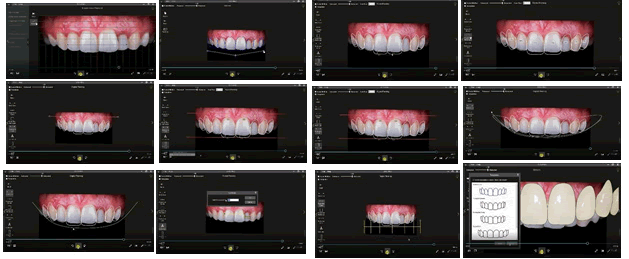
Figure 7: Digital smile designing/planning the smile curve; can be adjusted following the lower lip curvature proportion guide; this golden proportion ruler. The size of the veneer can be adjusted with the reference of this guide reference lines; can be used as a reference from the measurements are carried out. Right click on the line to add a new line.
Gum texture; gum layer can be inserted for characterization, and the gum layer should be cover all veneers. Using the eraser tool to erase all gum layers extending on the teeth that are not veneered. Do not worry about the gums extending on the lips, and gum color can be adjusted on the preview screen. [12] Digital smile designing/planning. The smile curve; can be adjusted following the lower lip curvature proportion guide; this the golden proportion ruler. The size of the veneer can be adjusted with the reference of this guide.
A proportion rectangle; can be used to check the width to height ratio of the veneers or crowns. Generally, the proportion of the central incisor veneer is 80%. Reference lines; can be used as a reference from the measurements are carried out. Right-click on the line to add a new line. [13] Calibration; measure the distance between two points (e.g. width of the central incisor) in the patient's mouth or on the models. Mark the same reference points on the image and enter the value in the pop-out box.
Measuring tool; left-click and drag between any two points to measure. The font size of the measurements can Instant smiles; the patient's existing smile can be replaced with a smile template that can only be inserted on an extraoral image by selecting the smile template. Adjust using two control points. The fit of the template can be verified using the opacity slider. the color and brightness of the smile template can be adjusted in the preview window. Save simulation; can be saved in the desired folder by exporting it in .JPEG or .PNG format in the preview screen. The enter patient design can also be saved as a project file (dtsp format) and edited later if needed.
Results
After complete collection the data by independent evaluators from the three groups for evaluation its level of satisfaction and the contribution the simulation software for helping treatment decision and the expectation of final restoration as following; Most of the studied participants from different tested groups reported the levels very good and excellent for different treatments procedures and they ensuring that the simulation software help him in expectation the final restoration and recommended that this software should be a part from dental clinics and laboratories, whereas less number reported for accepted and good level.
Discussion
Smile design can be achieved virtually, giving a patient a clearer idea of the desired treatment results before starting the actual treatment. Most smile analysis software applications take a long time to learn. Though, the artificial intelligence-powered DTS PRO can achive a sophisticated tasks with an intuitive workflow. More realistic and personalized smile is created by combining the basic principles of esthetics the facial features and the smile preference. This theory assumes that the smile design and the patient's personality are in sync. [9,17]
The DTS PRO definition, which can be implemented quickly and efficiently, offer help to dentist or ceramist in accomplishing their goals in the most cases. According to the authors' clinical knowledge, at least 80% of patients support the final smile concept procedure. The simulation of restorations in anterior teeth using a computer shows a useful tool that improves the communication between the dentist to patient and the dental lab. The techniques that can be applied for this purpose vary and depend mainly on the used program. Knowledge of taking photos for dental purposes and the basic operation of a program computer image processing are essential pre assumptions for the whole process's success. As a result, we looked at the use of a digital simulation workflow in a variety of dental fields in this study. In this way, it will be possible to predict the angulation and orientation of the prosthesis or any other treatment modalities. All these ensure the treatment needed by the patients and ensures their satisfaction.
Conclusion
Nowadays, as the technology develop rapidly; the physician must follow the most recent technology to improve the quality of their outcome. The use of special image processing and photographic software can significantly benefit the dentist and make the dental visit much easier and enjoyable by the patient through improving the level of communication and showing the predicted outcome before starting the treatment. The image of the final restoration should not impress the patient too much and the dentist with technicians must always reminds the patient that digital a predictive tool for the outcome and the risk of any complications is not ever eliminated.
Acknowledgment
Special thanks to the Deanship of Scientific Research (DSR) and the faculty of Dentistry at king Abdul-Aziz University at Jeddah, Saudi Arabia for supporting the research work as well as engaging the researcher to establish novels and productive research. I would also like to thank the Faculty of Dental Medicine at Alazhar University, Assuit Branch for all the facilities they provide us physically and emotionally.
References
- Coachman C, Calamita M. Digital smile design: A tool for treatment planning and communication in esthetic dentistry. Dent Today. 2007;26:104-5. [Crossref], [Google Scholar], [Indexed]
- Agnini A, Apponi R, Maffei S, Agnini A. Digital dental workflow for a smile makeover restoration. Int J Esthet Dent. 2020;15:374-89. [Crossref], [Google Scholar], [Indexed]
- Tuin AJ, Meulstee JW, Loonen TGJ, Kraeima J, Spijkervet FKL, Vissink A, et al. Three-dimensional facial volume analysis using algorithm-based personalized aesthetic templates. Int J Oral Maxillofac Surg.2020;49:1379-84. [Crossref], [Google Scholar], [Indexed]
- Jafri Z, Ahmad N, Sawai M, Sultan N, Bhardwaj A. Digital smile design-an innovative tool in aesthetic dentistry. J Oral Biol Craniofacial Res. 2020;10:194-8. [Crossref], [Google Scholar], [Indexed]
- Zimmermann MMA. Virtual smile design systems: A current review. Int J Comput Dent 2015;18:303-317. [Crossref], [Google Scholar], [Indexed]
- Giudice AL, Ortensi L, Farronato M, Lucchese A. The step further smile virtual planning: Milled versus prototyped mock-ups for the evaluation of the designed smile characteristics. BMC Oral Health. 2020;20:165. [Crossref], [Google Scholar], [Indexed]
- Dds CC, Bernhard M, Dmd B, Dentistry R, Dds LB, Dds NS. Dental software classification and dentofacial interdisciplinary planning platform. 2021;33:1-8. [Crossref], [Google Scholar]
- Papasotiriou OS, Nathanson DGR. Computer imaging versus conventional aesthetic consultation: A prospective clinical study. J Esthet Dent. 2000;12:72-7. [Crossref], [Google Scholar]
- Thomas JR, Freeman MS, Remmler DJET. Analysis of patient response to preoperative computerized video imaging. Arch Otolaryngol Head Neck Surg. 1989;115:793-6. [Crossref], [Google Scholar], [Indexed]
- Coachman C, Georg R, Bohner L, Rigo LC, Sesma N. Chairside 3D digital design and trial restoration workflow. J Prosthet Dent. 2020;124:514-520. [Crossref], [Google Scholar], [Indexed]
- Bidra ASUF. Bidra AS, Uribe F. Preprosthetic orthodontic intervention for management of a partially edentulous patient with generalized wear and malocclusion. J Esthet Restor Dent. 2012;24:88-100. [Crossref], [Google Scholar], [Indexed]
- Coachman C, Calamita MA, Sesma N. Dynamic documentation of the smile and the 2D/3D digital smile design process. Int J Periodontics Restorative Dent. 2017;37:183-193. [Crossref], [Google Scholar], [Indexed]
- Goldstein CE, Goldstein REGDA. Imaging in aesthetic dentistry, imaging in aesthetic dentistry. Quintessence Publishing. USA. 1998.
- Zhivago P, Turkyilmaz I. A comprehensive digital approach to enhance smiles using an intraoral optical scanner and advanced 3-D sculpting software. J Dent Sci. 2020;16:784-785. [Crossref], [Google Scholar], [Indexed]
- Van Meerbeek B, Yosihara K, Yoshida Y, Mine A, De Munck J, Van Landuyt KL. State of the art of self-etch adhesives. Dent Mater 2011;27:17–28. [Crossref], [Google Scholar], [Indexed]
- Spagnuolo G, Ametrano G, D'Antò V, Formisano A, Simeone M, Riccitiello F, et al. Microcomputed tomography analysis of mesiobuccal orifices and major apical foramen in first maxillary molars. Open Dent J. 2012;6:118-125. [Crossref], [Google Scholar], [Indexed]
- Cervino G, Fiorillo L, Arzukanyan AV, Spagnuolo G, Cicciù M. Dental restorative digital workflow: Digital smile design from aesthetic to function. Dent J. 2019;7. [Crossref], [Google Scholar], [Indexed]





 The Annals of Medical and Health Sciences Research is a monthly multidisciplinary medical journal.